5. SOFTWARE
The software installed on the cluster can be installed standalone or installed with modules.
A not-comprehensive list of available software is:
Other software and software versions may be found through modules or in the directory /software.
5.1. Abaqus
Abaqus software is available on CFDHub.
The software is installed in /software/Abaqus20xx (where xx is the year version 2019 or 2021 etc.)
With ls in the /software/ folder it is possible to check which versions are available.
[<username>@nodevg-0-1 ~]$ cd /software
[<username>@nodevg-0-1 software]$ ls
To submit an Abqus job, prepare the launch file, for example: AbaqusJob.sh, that will be used to run your script. Please check with your CFDHub Contact Person what are the resources and the queues you have access to.
The result of the computation will be written on file (please make sure to save all relevant variables). The output will be written on the jobOutput file.
#!/bin.bash             # use bash as command interpreter
#$ -cwd                 # currentWorkingDirectory
#$ -N myAbaqusJob       # jobName
#$ -j y                 # merges output and errors
#$ -S /bin/bash         # scripting language
#$ -l walltime=1:00:00  # jobDuration hh:mm:ss
#$ -q hub.q             # queueName
#$ -pe smp 2            # asking 2 processes on single node
##$ -pe mpi 2           # asking 2 processes on any node
#________________________________________________________

/software/Abaqus2021/DassaultSystemes/SIMULIA/Commands/abaqus j=JobInpName cpus=2 int
/software/Abaqus2021/DassaultSystemes/SIMULIA/Commands/abaqus j=JobInpName2 cpus=2 int
/software/Abaqus2021/DassaultSystemes/SIMULIA/Commands/abaqus j=JobInpName3 cpus=2 int
/software/Abaqus2021/DassaultSystemes/SIMULIA/Commands/abaqus j=JobInpName4 cpus=2 int

### this script submits each simulation after the completition of the previouse one

echo "End Parallel Run"
ATTENTION: if you do not use the ``int`` command, all the simulations are submitted in the same time, OVERLOADING the node or the nodes.
The administrator can take actions as well if the script is not well configured.
5.2. Ansys Fluent
This section presents how to start and configure Ansys Fluent on the cluster. The user is expected to have some experience with this CFD code since this user guide covers how to access Ansys Fluent on a single or multiple nodes.
5.2.1. Launch Fluent from Terminal
Before launching Ansys Fluent is necessary to enter in the node where the user want to run the simulation.
After the user has logged from the terminal to the node, should go into the folder where the case to be run is located. From this folder the user should launch the command:
/software/ansys_inc/v212/fluent/bin/fluent
5.2.2. Batch job using queues
To submit a Fluent job using queues, prepare the launch file fluentJob.sh that will be used to run your script. Please check with your CFDHub Contact Person what are the queues you have access to.
The result of the computation will be written on file (please make sure to save all relevant variables). The output will be written on the outputfile.txt file.
If you are asking for more than one cpu, please make sure your script will use all requested cpus.
#!/bin.bash             # use bash as command interpreter
#$ -cwd                 # currentWorkingDirectory
#$ -N jobName           # jobName
#$ -j y                 # merges output and errors
#$ -S /bin/bash         # scripting language
#$ -l h_rt=1:00:00      # jobDuration hh:mm:ss
#$ -q hub.q             # queueName
#$ -pe smp 2            # asking 2 processes on single node
##$ -pe mpi 2           # asking 2 processes on any node
#________________________________________________________

# -t2 --> 2 must be equal to cpuNumber
/software/ansys2023R2/v232/fluent/bin/fluent 3ddp -t2 -cnf=machinefile.$JOB_ID -g < inputfile.txt > outputfile.txt

echo End Parallel Run
To launch your fluentJob.sh file you may execute:
[<username>@nodevg-0-1 jobDirectory]$ qsub fluentJob.sh
To check how the job is proceeding from the login node, reading the output, you may use:
[<username>@nodevg-0-1 jobDirectory]$ tail -f outputfile.txt
5.2.3. Parallel run on Single Node set-up
If the user wants to make a parallel run just with the processors of a single node, Ansys Fluent should be configurated as follows. In Parallel Settings tab, the voice Shared Memory On Local Machine should be selected under the the voice Run Types, as can be seen in the following figure:

At the voice Solver Processes the user could also select how many cores wants to use.
5.2.4. Parallel run on Multiple Nodes set-up
If the user wants to make a parallel run with the processors of multiple nodes, Ansys Fluent should be configurated as follows. In Parallel Settings tab, the voice Distributed Memory On a Cluster should be selected under the the voice Run Types, as can be seen in the next figure. When Distributed Memory On a Cluster is selected, new options appears. Selecting Machine Names it is possible to enlist the nodes that the user wants to use, as can be seen in the following figure:
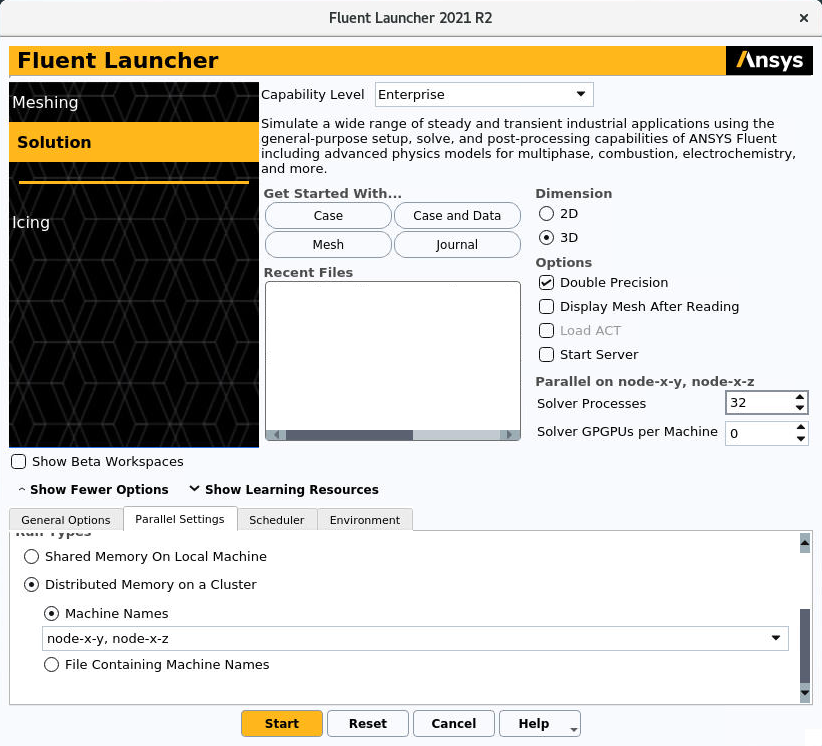
At the voice Solver Processes the user could also select how many cores wants to use. When not explicited, the cores will be equally distributed on the multiple node. The user can choose how to distribute the cores on the nodes changing from node-x-y, node-x-z in figure with node-x-y:16, node-x-z:16 assunming that the user is working with a total of 32 processors.
5.2.5. Parallel CPU+GPU run set-up
5.2.6. Management of crashed processes
When the user starts Ansys Fluent, in the working directory (by default the path where you are launching Ansys Fluent) a script named cleanup-fluent`…`.sh is created. If for various reasons Ansys Fluent crashes, typically giving an error message in red color, the Fluent processes could not stop or leave residual processes running. You can check it with the top or htop command. In order to clean this processes the user can use the .sh file previously created by launching:
sh cleanup-fluent`...`.sh
When Ansys Fluent is correctly stopped, the script cleanup-fluent`…`.sh is automatically deleted. This procedure is advised everytime that this script doesn’t automatically disappear after closing Ansys Fluent.
5.3. Comsol
TBD
5.4. FDS
TBD
5.5. Matlab
Matlab Software is available on CFDHub.
The software is installed in /software/MATLAB. With ls in the folder is possible to check which versions are available.
[<username>@nodevg-0-1 ~]$ cd /software/MATLAB
[<username>@nodevg-0-1 MATLAB]$ ls
If you are asking for more than one cpu, please make sure your script will use all requested cpus.
You can use the software in different ways:
5.5.1. Batch job using queues
To submit a Matlab job using queues, prepare the launch file matlabJob.sh that will be used to run your script. Please check with your CFDHub Contact Person what are the queues you have access to.
The result of the computation will be written on file (please make sure to save all relevant variables). The output will be written on the jobOutput file. if you wish you may redirect in another file (myMatlabOutput).
In this case you will not have the graphical interface, so make sure your script does not open any figure, otherwise its execution will stop with errors.
If you are asking for more than one cpu, please make sure your script will use all requested cpus.
#!/bin.bash             # use bash as command interpreter
#$ -cwd                 # currentWorkingDirectory
#$ -N myMatlabJob       # jobName
#$ -j y                 # merges output and errors
#$ -S /bin/bash         # scripting language
#$ -l h_rt=1:00:00      # jobDuration hh:mm:ss
#$ -q hub.q             # queueName
#$ -pe smp 2            # asking 2 processes on single node
##$ -pe mpi 2            # asking 2 processes on any node
#________________________________________________________

### Runs the Matlab "script.m" file.
### You may change it to launch your script.
###
### Change R2018a with your desired version

/software/MATLAB/R2018a/bin/matlab -nodesktop -nosplash -r "script"
# /software/MATLAB/R2018a/bin/matlab -nodesktop -nosplash -r "script" >& myMatlabOutput

### You may run also a second script
### or another software in the same job.

/software/MATLAB/R2018a/bin/matlab -nodesktop -nosplash -r "script2"

echo End Parallel Run
To launch your matlabJob.sh file you may execute:
[<username>@nodevg-0-1 jobDirectory]$ qsub matlabJob.sh
To check how the job is proceeding from the login node, reading the output, you may use:
[<username>@nodevg-0-1 jobDirectory]$ tail -f myMatlabOutput
5.5.2. Interactive job using queues
To submit an interactive Matlab job using queues, you need to ask one or more cpus to the desired queue. Please check with your CFDHub Contact Person what are the queues you have access to.
In this case you will not have the graphical interface, so make sure your script does not open any figure, otherwise its execution will stop with errors.
If you are asking for more than one cpu, please make sure your script will use all requested cpus.
You need to follow the instructions to launch an interactive job on a queue. Be sure to be logged in your login node (nodevg-0-1 or nodevg-0-2) and ask to the Job Scheduler your resources:
qrsh -q hub.q -l h_rt=2:00:00 -l h_vmem=2G -pe mpi 2
These instructions request on the hub.q queue (-q hub.q) 2 cpus (-pe mpi 2) for 2 hours (-l h_rt=2:00:00, hh:mm:ss) and 2GB of RAM (-l h_vmem=2G).
You can adjust the request according to your need.
As reported in the instructions to launch an interactive job you may prepare an alias as well.
The result of the computation will be written on file (please make sure to save all relevant variables). The output will be written on the jobOutput file. if you wish you may redirect in another file (myMatlabOutput).
You will be then redirected on a node, ready to start your computation:
[<username>@nodevg-0-1 ~]$ qrsh -q hub.q -l h_rt=2:00:00 -l h_vmem=2G -pe mpi 2
... wait for node assigment
[<username>@<node> ~]$
... node assigned
[<username>@<node> ~]$ cd myScriptDir
[<username>@<node> myScriptDir]$ /software/MATLAB/R2018a/bin/matlab -nodesktop -nosplash -r "script"
[<username>@<node> myScriptDir]$ /software/MATLAB/R2018a/bin/matlab -nodesktop -nosplash -r "script" >& myMatlabOutput &
You will be running the script “script.m” using Matlab R2018a.
To check how the job is proceeding when writing the output to file you may use:
[<username>@<node> myScriptDir]$ tail -f myMatlabOutput
5.5.3. Interactive job on a node
To submit an interactive Matlab job on a node, you need to login on a node. Please check with your CFDHub Contact Person what are the nodes you have access to.
If you are asking for more than one cpu, please make sure your script will use all requested cpus.
You need to follow the instructions to launch an interactive job on a node. Be sure to be logged in your login node (nodevg-0-1 or nodevg-0-1) and check if your desired node is free.
Once you logged in a node, you may run your script:
[<username>@nodevg-0-1 ~]$ ssh <node>
[<username>@nodevg-0-1 ~]$ cd myFolder
[<username>@<node> myFolder]$ /software/MATLAB/R2018a/bin/matlab -nodesktop -nosplash -r "script"``
5.5.4. Batch job on multiple nodes
This guide is intended to guide the user through the submission of a Matlab job on multiple nodes.
Up to now, it was possible to launch a Matlab job on a single node (using all or a part of the available cores on the nodes) using the ‘local’ profile to start a Matlab parpool. However, the job failed if it was asked to run on multiple nodes.
The solution to this problem is to create a new Matlab Cluster configuration.
To do so, it is necessary to:
Go in the Home tab, click on Parallel -> Create and Manage Clusters (under Environment);

In the Cluster Profile Manager, click on Add Cluster Profile -> Generic;
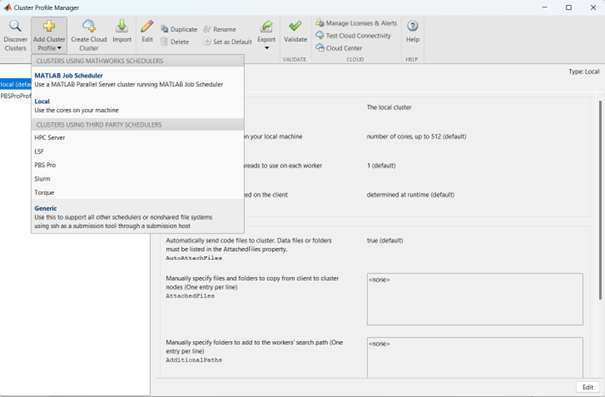
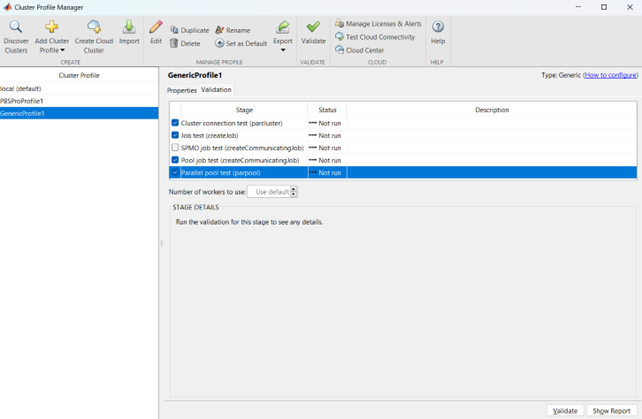
In the Cluster Profile Manager, select the newly created Generic Profile and select Edit (down on the right of the Cluster Profile Manager windows);
Now you can insert a description of the Cluster, specify the NumWorkers property by setting it to 320 (max number of workers that can be required by the user) and fill the Plugin Scripts Location query. Select browse to specify the folder where you have the matlab plugin script for sun grid engine (i.e.: ‘/global-scratch/bulk-pool/USER_XX/matlab-parallel-gridengine-plugin’). Fill the Additional Properties query by indicating as Value for the Name “Queue” the corresponding queue where you want to submit the job (i.e.: mecc4.q, mecc2.q, cfdguest.q, all.q, hub.q, etc…). By default, if no queue is indicated, the job will run on “mecc4.q”. Click Done (down on the right of the Cluster Profile Manager window);
T.B.N.: The ad-hoc version of the matlab-parallel-gridengine-plugin folder has to be requested to the system administrator of your section (the version that you can find online had to be changed to ensure compatibility with the CFDHUB cluster).

Now it is possible to perform the validation of the newly created Generic Profile. Select the Validation tab in the Cluster Profile Manager, deselect SPMD job test, choose the number of workers to use for the validation (of course, select a number of workers-cores big enough so as to have two or more nodes working) and click on Validate to test the profile (down on the right of the Cluster Profile Manager window). If one of the tests failed, please contact the system administrator.
If everything went fine, you are now able to launch Matlab jobs on multiple nodes.
The whole procedure could be performed both using the Matlab GUI or working directly from the matlab terminal (programmatically, please refer to the mathworks site if you chose to use this option).
Of course, when starting the parpool it will be mandatory to specify that now we want to use the newly created Generic Profile, followed by the number of workers that we want to use.
i.e.: parpool(‘GenericProfile’,80)
p = gcp('nocreate');
if isempty(p)
    myPC = parcluster('Gen1');
    myPC.AdditionalProperties.Queue = 'mecc4.q';
    parpool(myPC,80);
end
Moreover, if the script/function that we intend to run in parallel on multiple nodes relies on other scripts/functions created by the user, it is necessary to specify such files and paths in the “Attached Files” and “Additional Paths” quey in the Cluster Profile Manager (of course, the same could be done programmatically).
5.6. OpenFOAM
OpenFOAM is available on CFDHub.
All three OpenFOAM versions are available:
The software is available through modules.
To make the system aware of OpenFOAM modules using the relevant module (module use ...), looking for the relevant version (module avail) and loading the choosen version (module load ...):
module use /software/modulefiles/CFD
module avail
module load openfoam-v2106
Sometimes you may find an issue to run OpenFOAM in parallel (bash: mpirun: command not found…). To solve the problem, yo need to load openmpi using:
module use /software/modulefiles/parallel/
module load openmpi-4.1.3-gcc.7.3.0
To check that you correctly loaded OpenFOAM, you can run the following command, verifying that the system recognizes the solver (simpleFOAM is available for all OpenFOAM versions) and it will tell you where it is located (to check that the correct version of OpenFOAM is loaded, OpenFOAM-8 in this case):
[<username>@nodevg-0-1 ~]$ which simpleFoam
/software/OpenFOAM/OpenFOAM-8/platforms/linux64GccDPInt32Opt/bin/simpleFoam
If you require to launch a job with many cpus please verify the scalability of your simulation (OpenFOAM generally scales well up to 100.000 cells per core), but please verify your setup. Since the cluster is used by many users please check the availability of cpus.
You can use the software in different ways:
5.6.1. List of OpenFOAM installations
For any question on OpenFOAM installations please contact Paolo Schito.
x86_64_v4 architecture + rocky8 (meccsys2.q)
module use /software/spack/spack_202401/share/spack/modules/linux-rocky8-x86_64_v4
module load openfoam/2412-gcc-9.1.0-zilnpkw
module load openfoam/2306-gcc-9.1.0-ppy3of4
module load openfoam-org/12-gcc-9.1.0-wfcs6c4
module load openfoam-org/11-gcc-9.1.0-hy3jfx7
module load openfoam-org/10-gcc-10.2.0-euwkm23
zen3 architecture + rocky8 (meccsys1.q)
module use /software/spack/spack_202601/share/spack/modules/linux-rocky8-zen3
module use /software/spack/spack_202601/share/spack/modules/linux-rocky8-x86_64/
module load openfoam/2412-gcc-14.2.0-32zlt6n
module load openfoam/2112_220610-gcc-14.2.0-nhlhq6e
module load openfoam-org/13-gcc-14.2.0-hdneyea
module load openfoam-org/12-gcc-14.2.0-dr6zz2e
module load openfoam-org/11-gcc-14.2.0-e5s5byy
module load openfoam-org/10-gcc-14.2.0-edq5ehn
zen2 architecture + centos7
module use /software/spack/spack_202401/share/spack/modules/linux-centos7-zen2
module load openfoam/2412-gcc-9.1.0-l6ptveh
module load openfoam/2306-gcc-9.1.0-a4lldmf
module load openfoam-org/12-gcc-9.1.0-3oaflrd
module load openfoam-org/11-gcc-10.2.0-5gzg4ht
module load openfoam-org/10-gcc-10.2.0-d3rsyaq
cascadelake architecture + centos7 (mecc4.q)
module use /software/spack/spack_202601/share/spack/modules/linux-centos7-cascadelake/
module use /software/spack/spack_202601/share/spack/modules/linux-centos7-x86_64/
module load openfoam-org/13-gcc-14.2.0sandy-5b6v5q3
module use /software/spack/spack_202401/share/spack/modules/linux-centos7-cascadelake
module load openfoam/2412-gcc-9.1.0-tsbl4gm
module load openfoam/2306-gcc-9.2.0-mfpm3lk
module load openfoam-org/12-gcc-9.1.0-aj7gt6l
module load openfoam-org/11-gcc-10.3.0-fhsnhie
module load openfoam-org/10-gcc-10.3.0-rogs5zz
module use /software/modulefiles/CFD/
module load openfoam-v2112
broadwell architecture + centos7 (mecc2.q)
module use /software/spack/spack_202401/share/spack/modules/linux-centos7-broadwell
module load openfoam/2412-gcc-9.1.0-kpjnmco
module load openfoam/2306-gcc-9.1.0-jyrxdkf
module load openfoam-org/12-gcc-9.1.0-ph6nxle
module load openfoam-org/11-gcc-9.1.0-drbzxto
module load openfoam-org/10-gcc-9.1.0-37satjd
ivybridge architecture + centos7 (mecc.q)
module use /software/spack/spack_202401/share/spack/modules/linux-centos7-ivybridge
module load openfoam/2412-gcc-9.1.0-pkrygox
module load openfoam/2306-gcc-9.1.0-jcy5gwz
module load openfoam/2206-gcc-9.1.0-schuhpa
module load openfoam-org/12-gcc-10.2.0-v4kiqsz
module load openfoam-org/11-gcc-10.2.0-t7q4wif
module load openfoam-org/10-gcc-10.2.0-lebsikt
5.6.2. Batch job using queues
To submit a OpenFOAM job using queues, prepare the launch file OpenFOAMJob.sh that will be used to run your script. Please check with your CFDHub Contact Person what are the queues you have access to.
The result of the computation will be written on file according to what you specified in your system/controlDict file. The output will be written on the jobOutput file. if you wish you may redirect in another file (typically log.$solver).
If you are asking for more than one cpu, please make sure your requested cpus and the number of *processors are coincident, so you will use all requested cpus.*
Here an example of launch file:
#!/bin.bash             # use bash as command interpreter
#$ -cwd                 # currentWorkingDirectory
#$ -N myOpenFOAMJob     # jobName
#$ -j y                 # merges output and errors
#$ -S /bin/bash         # scripting language
#$ -l h_rt=3:00:00      # jobDuration hh:mm:ss
#$ -q hub.q             # queueName
#$ -pe smp 2            # asking 2 processes on single node
##$ -pe mpi 2           # asking 2 processes on any node
#---------------------------------------------------------

### LOAD THE OPENFOAM ENVIRONMENT
module use /software/modulefiles/CFD
module load openfoam-v2106

# module use /software/modulefiles/parallel/     # if necessary
# module load openmpi-4.1.3-gcc.7.3.0            # if necessary

#---------------------------------------------------------

### EXECUTE COMMANDS
#./Allrun

blockMesh >& log.blockMesh
decomposePar >& log.decomposePar
mpirun -np 2 --bind-to none --hostfile machinefile.$JOB_ID snappyHexMesh -parallel >& log.snappyHexMesh
mpirun -np 2 --bind-to none --hostfile machinefile.$JOB_ID simpleFoam -parallel >& log.simpleFoam
reconstructPar -latestTime >& log.reconstructPar
sample -latestTime >& log.sample

echo End Parallel Run
Just add/remove hashtags [#] to comment/uncomment the lines. To execute the commands, you may either include an executable file (Allrun in this case), or list all relevant commands.
To launch your OpenFOAMJob.sh file from the login node, from the jobDirectory you may execute:
[<username>@nodevg-0-x jobDirectory]$ qsub OpenFOAMJob.sh
To check the status of the job you may use the qstat -u <username> command to see if the job started. To check how the job is proceeding from the login node, reading the output, you may use:
[<username>@nodevg-0-1 jobDirectory]$ tail -f log.simpleFoam
5.6.3. Interactive job using queues
To submit an interactive OpenFOAM job using queues, you need to ask one or more cpus to the desired queue. Please check with your CFDHub Contact Person what are the queues you have access to.
If you are asking for more than one cpu, please make sure your script will use all requested cpus.
You need to follow the instructions to launch an interactive job on a queue. Be sure to be logged in your login node (nodevg-0-1 or nodevg-0-2) and ask to the Job Scheduler your resources:
qrsh -q hub.q -l h_rt=2:00:00 -l h_vmem=2G -pe mpi 2
These instructions request on the hub.q queue (-q hub.q) 2 cpus (-pe mpi 2) for 2 hours (-l h_rt=2:00:00, hh:mm:ss) and 2GB of RAM (-l h_vmem=2G).
You can adjust the request according to your need.
As reported in the instructions to launch an interactive job you may prepare an alias as well.
To make an interactive OpenFOAM job you will need to ask some computational resources qrsh -q ..., load the OpenFOAM environment sourcing the bashrc or loading the module (eventually verifying that everything works correctly which simpleFoam) and then start with the interactive job:
[<username>@nodevg-0-1 ~]$ qrsh -q hub.q -l h_rt=2:00:00 -l h_vmem=2G -pe mpi 2
... wait for node assigment
[<username>@<node> ~]$
... node assigned
[<username>@<node> ~]$ module use /software/modulefiles/CFD
[<username>@<node> ~]$ module load openfoam-v8
# [<username>@<node> ~]$ module use /software/modulefiles/parallel/     # if necessary
# [<username>@<node> ~]$ module load openmpi-4.1.3-gcc.7.3.0            # if necessary
[<username>@<node> ~]$ which simpleFoam
/software/OpenFOAM/OpenFOAM-8/platforms/linux64GccDPInt32Opt/bin/simpleFoam
[<username>@<node> ~]$ cd myJobFolder
[<username>@<node> myJobFolder]$ blockMesh
[<username>@<node> myScriptDir]$ blockMesh >& log.blockMesh &
[<username>@<node> myScriptDir]$ tail -f log.blockMesh
You will be running blockMesh using OpenFOAM-8.
Two ways of running are reported: in the first you will see what the solver is foreground; in the second the solver will run in background (see tailing &) writing to file the output.
5.6.4. Interactive job on a node
To submit an interactive OpenFOAM job on a node, you need to login on a node. Please check with your CFDHub Contact Person what are the nodes you have access to.
You need to follow the instructions to launch an interactive job on a node. Be sure to be logged in your login node (nodevg-0-1 or nodevg-0-1) and check if your desired node is free.
Once you logged in a node, load the OpenFOAM environment sourcing the bashrc or loading the module (eventually verifying that everything works correctly which simpleFoam) and then start with the interactive job:
[<username>@nodevg-0-1 ~]$ ssh <node>
[<username>@<node> ~]$ module use /software/modulefiles/CFD
[<username>@<node> ~]$ module load openfoam-v8
# [<username>@<node> ~]$ module use /software/modulefiles/parallel/     # if necessary
# [<username>@<node> ~]$ module load openmpi-4.1.3-gcc.7.3.0            # if necessary
[<username>@<node> ~]$ which simpleFoam
/software/OpenFOAM/OpenFOAM-8/platforms/linux64GccDPInt32Opt/bin/simpleFoam
[<username>@<node> ~]$ cd myJobFolder
[<username>@<node> myJobFolder]$ blockMesh
[<username>@<node> myScriptDir]$ blockMesh >& log.blockMesh &
[<username>@<node> myScriptDir]$ tail -f log.blockMesh
You will be running blockMesh using OpenFOAM-8.
Two ways of running are reported: in the first you will see what the solver is foreground; in the second the solver will run in background (see tailing &) writing to file the output.
5.7. ParaView
ParaView is available on CFDHub.
The software is available in Linux OS.
You can use the software in different ways:
ParaView on node with remote visualization [TBD];
5.7.1. ParaView in server-client mode using queues
This ParaView setup allows you to use your local client to manage the pipeline and filters, while processing data on computation nodes. Rendering is managed either on the cluster node or on your machine, depending on the load. This setup allows you to visualize simulation content and perform pre- and post-processing more quickly.
5.7.1.1. Install ParaView client
To use ParaView in server-client configuration, the versions installed on both the cluster and your client should match. Download and install Paraview 5.10.1 on your local workstation. Sources and installers for various operating systems are available here: https://www.paraview.org/download
5.7.1.2. Configure the server on the ParaView client
Start ParaView.
Select the connect icon in the top left, as shown in Figure P1. This opens the Server Configuration menu. Click on “Add Server.”
In the “Edit Server Configuration” window, leave all values at default. Substitute the name with CFDhub, as shown in Figure P2.

Figure P1: connect button

Figure P2: “Edit Server Configuration” window
From now on, to connect your client to CFDhub, simply select the server and click connect, as long as ParaView has been started on the server side and the SSH tunnel created.
5.7.1.3. Define the alias LaunchPVserver
To operate ParaView in server-client mode, it is necessary to start the server in headless mode using the pvserver command. To manage this through the queue system, a bash script has been set up. Add an alias in your .bash_profile or in your .bashrc:
alias LaunchPVserver='/software/environment/dmec/launch_pvserver.sh'
5.7.1.4. Start the pvserver and create the SSH tunnel
When you want to launch a ParaView session, run LaunchPVserver.
The program will ask for:
The queue name (please check with your advisor which queues you can use).
Number of hours needed for the instance (please select 1 if you do not intend to do long renderings).
The amount of RAM (in GB) needed to be allocated.
The number of parallel processes.
The program will then allocate resources on a node, select a server port for the user, and start the pvserver in parallel, printing something similar to:
[username@nodevg-0-3 username]$ LaunchPVserver
Enter queue name: nmec.q
Enter number of hours needed: 1
Enter amount of RAM needed (in GB): 16
Enter number of parallel processes (NCPU): 4
Running on node: node-m-12
=====================================================================
Node name: node-m-12
Port: 23332
Starting pvserver on allocated node...
To create a tunnel, run the following command in your local terminal:
ssh -L 11111:node-m-12:23332 username@131.175.56.199
=====================================================================
Waiting for client...
Connection URL: cs://node-m-12:23332
Accepting connection(s): node-m-12:23332
Afterwards, start a specific SSH tunnel on a local terminal. Enter the command printed by LaunchPVserver. In this case, that would be:
ssh -L 11111:node-m-12:23332 username@131.175.56.199
You can do this in your command prompt or in mobaXterm. BEWARE: The terminal must remain active while using ParaView.
Now, open your ParaView client, access the Server Configuration Menu, and connect to the server. Once connected, pvserver will print Client connected... You can now access data on CFDhub by opening files directly from your client, as the SSH tunnel allows direct browsing. To close the session, simply close Paraview.
BEWARE: Closing the terminal in which you ran LaunchPVserver will also close the session.
5.7.1.5. Best Practices
If you don’t need long rendering, select 1 hour. Always close ParaView after finishing post-processing.
How much RAM do you need? It depends on several factors: mesh size, data values per cell, and applied filters. A good rule of thumb is 2–4 GB per processor. Track memory usage by enabling Memory Inspector in the View menu.
For heavy OpenFOAM results, it is advisable to keep the case decomposed; otherwise, data manipulation will be single-core. For structured data, use 1 core per 5M mesh elements; for unstructured data, use approximately 1 core per 500k elements. Note that some filters transform data from structured to unstructured.
If opening a non-decomposed OpenFOAM case, only select a single CPU, as selecting more won’t speed up data manipulation; it will only speed up rendering.
5.8. Python
Python is available on CFDHub.
The software is available in Linux OS.
You can use the software in different ways:
5.8.1. Batch job using queues
To submit a Python job using queues, prepare the launch file PythonJob.sh that will be used to run your script. Please check with your CFDHub Contact Person what are the queues you have access to.
The result of the computation will be written on file (please make sure to save all relevant variables). The output will be written on the jobOutput file. if you wish you may redirect in another file (myPythonOutput).
If you are asking for more than one cpu, please make sure your requested cpus and the number of *processors are coincident, so you will use all requested cpus.*
Here an example of launch file:
#!/bin.bash             # use bash as command interpreter
#$ -cwd                 # currentWorkingDirectory
#$ -N myPythonJob       # jobName
#$ -j y                 # merges output and errors
#$ -S /bin/bash         # scripting language
#$ -l h_rt=2:00:00      # jobDuration hh:mm:ss
#$ -q hub.q             # queueName
#$ -pe smp 2            # asking 2 processes on single node
##$ -pe mpi 2           # asking 2 processes on any node
#---------------------------------------------------------

### EXECUTE COMMANDS
python myPythonScript >& myPythonOutput

echo End Parallel Run
5.8.2. Interactive job using queues
To submit an interactive Python job using queues, you need to ask one or more cpus to the desired queue. Please check with your CFDHub Contact Person what are the queues you have access to.
You need to follow the instructions to launch an interactive job on a queue. Be sure to be logged in your login node (nodevg-0-1 or nodevg-0-2) and ask to the Job Scheduler your resources:
qrsh -q hub.q -l h_rt=2:00:00 -l h_vmem=2G -pe mpi 2
These instructions request on the hub.q queue (-q hub.q) 2 cpus (-pe mpi 2) for 2 hours (-l h_rt=2:00:00, hh:mm:ss) and 2GB of RAM (-l h_vmem=2G).
You can adjust the request according to your need.
As reported in the instructions to launch an interactive job you may prepare an alias as well.
To make an interactive Python job you will need to ask some computational resources qrsh -q ..., and then start with the interactive job which may be with a script or directly writing commands:
[<username>@nodevg-0-1 ~]$ qrsh -q hub.q -l h_rt=2:00:00 -l h_vmem=2G -pe mpi 2
... wait for node assigment
[<username>@<node> ~]$
... node assigned
[<username>@<node> ~]$ cd myJobFolder
[<username>@<node> myJobFolder]$ python myPythonScript.py
[<username>@<node> ~]$ python
Python 2.6.6 (r266:84292, Nov 22 2013, 12:16:22)
[GCC 4.4.7 20120313 (Red Hat 4.4.7-4)] on linux2
Type "help", "copyright", "credits" or "license" for more information.
>>>
Two ways of running are reported: in the first you are running your myPythonScript; in the second you are writing the instructions to python.
5.8.3. Interactive job on a node
To submit an interactive OpenFOAM job on a node, you need to login on a node. Please check with your CFDHub Contact Person what are the nodes you have access to.
You need to follow the instructions to launch an interactive job on a node. Be sure to be logged in your login node (nodevg-0-1 or nodevg-0-1) and check if your desired node is free.
To make an interactive Python job you will need to ask some computational resources qrsh -q ..., and then start with the interactive job which may be with a script or directly writing commands:
[<username>@nodevg-0-1 ~]$ ssh <node>
[<username>@<node> ~]$ cd myJobFolder
[<username>@<node> myJobFolder]$ python myPythonScript.py
[<username>@<node> ~]$ python
Python 2.6.6 (r266:84292, Nov 22 2013, 12:16:22)
[GCC 4.4.7 20120313 (Red Hat 4.4.7-4)] on linux2
Type "help", "copyright", "credits" or "license" for more information.
>>>
Two ways of running are reported: in the first you are running your myPythonScript; in the second you are writing the instructions to python.
5.9. Spack
Spack is a package management tool designed to support multiple versions and configurations of software on a wide variety of platforms and environments: it is non-destructive, therefore installing a new version does not break existing installations, so many configurations can coexist on the same system.
You can download and setup Spack by cloning it from the Github repository (it is suggested that you do it in your /global-scratch/bulk_pool/$USER folder, as it may fill up your $HOME folder rather quickly):
git clone -c feature.manyFiles=true https://github.com/spack/spack.git
This will create a directory called spack; in order to use it, you need to add the following command to your .bashrc file, and the source it:
. /global-scratch/bulk_pool/$USER/spack/share/spack/setup-env.sh
or you can create an alias to be placed with your aliases:
alias loadSpack='. /global-scratch/bulk_pool/$USER/spack/share/spack/setup-env.sh'
To load spack you may just digit loadSpack. AAA
Spack, by default, will store test, cache and source files outside of your scratch folder, which might fill up all the available space; it is suggested that you create a folder in your main spack directory (for example tmp), and then edit the config.yaml file found in /spack/etc/spack/defaults, so that it will save those files inside of the folder you made:
vi config.yaml

build_stage:
 - $tempdir/$user/spack-stage  becomes  - $spack/<new_folder>/spack-stage
 - $user_cache_path/stage  becomes  - $spack/var/spack/stage

test_stage: $user_cache_path/test  becomes  test_stage: $spack/<new_folder>/test

misc_cache: $user_cache_path/cache  becomes  misc_cache: $spack/<new_folder>/cache
When installing a software, a compiler must be loaded into Spack; by default, CentOS 7 uses gcc 4.8.5, which is quite outdated, therefore it is suggested to load your preferred version of gcc (for the following tutorial, we’ll use 9.3.0):
module use /software/modulefiles/compilers
module avail
module load gcc-9.3.0
spack compiler find
You can also install gcc:
spack install gcc
spack compiler find
To list all the compilers:
spack compilers
5.9.1. Tutorial
The main functionalities of Spack will be explained through the installation of AmgX, which is a GPU accelerated core solver library that speeds up computationally intense linear solver portion of simulations made by NVIDIA.
Before starting, AmgX requires CUDA, which is a parallel computing platform and programming model developed by NVIDIA for general computing on GPUs; CUDA is already installed on CFD-HUB, and can be used by editing and sourcing your .bashrc file:
export PATH="/usr/local/cuda/bin:$PATH"
export LD_LIBRARY_PATH="/usr/local/cuda/lib64:$LD_LIBRARY_PATH"
You can check the current version of CUDA by:
nvcc --version
A useful command to check installation options and information about a certain software is:
spack info --all amgx
To see a list of all the dependencies which will be installed, along with information about the version and which compilers will be used, you can type:
spack spec amgx
Here, by checking the list of dependencies, we can see that spack will try to install a newer version of CUDA, which is however incompatible with the NVIDIA drivers installed on the cluster, therefore we’ll have to specify to spack that we want to use the version of CUDA which is already installed on the system, which can be done by editing the file /spack/etc/spack/defaults/packages.yaml: and adding under “packages” the cuda specifications:
packages:
 cuda:
  externals:
  - spec: cuda@11.2%gcc@9.3.0
    prefix: /usr/local/cuda
  buildable: false
Also, Spack will try to install an outdated version of AmgX, which is incompatible with CUDA 11.2, so we’ll have to edit the package.py file found at /spack/var/spack/repos/builtin/packages/amgx; it should look like this (edit just the url and add the new version):
url = "https://github.com/NVIDIA/AMGX/archive/refs/tags/v2.3.0.tar.gz"
version("2.3.0", url="https://github.com/NVIDIA/AMGX/archive/refs/tags/v2.3.0.tar.gz")
Now we are ready to install AmgX: we want to specify that we want version 2.3.0, compiled with gcc version 9.3.0, which can be done by typing amgx@2.3.0%gcc@9.3.0 (@ specifies the version, % specifies the compiler).
Spack however requires that, for each package built with CUDA (including dependencies), you specify which architecture the GPU is built on, and this can be done by typing cuda_arch=70.
If we want to use AmgX with MPI, we also need to specify that both OpenMPI and HWLOC use CUDA, which can be done by typing ^openmpi@4.1.5+cuda (spack might try to install an older version of OpenMPI, so we’ll specify the newer one) and ^hwloc+cuda (^ specifies which dependency you want to install, + indicates which additional installation options you want to add).
Additional options about the installation process must be added: in our case, because we’re downloading the source from a link we provided ourselves, we need to add –no-checksum; also, AmgX source files must be kept in our spack-stage folder (wherever you specified it), so we’ll add –keep-stage.
The command should look like this:
spack install --no-checksum --keep-stage amgx@2.3.0%gcc@9.3.0 cuda_arch=70 ^openmpi@4.1.5+cuda cuda_arch=70 ^hwloc+cuda cuda_arch=70 > log.amgx230_gcc930 &
A good practice is to write this command to a file (eventually named amgx230_gcc930) so you can keep track of the submitted command and track of the log file. To submit the command just type ./amgx230_gcc930 and you will be able to read the log file by typing tail -f log.amgx230_gcc930. You can use these files in a separated folder (for example “installations”).
To verify that the amgx installation works, copy the file matrix.mtx located in /spack-stage/<amgx-stage>/spack-src/examples (your source folder) to the folder spack/opt/spack/linux-centos7-cascadelake/gcc-9.3.0/<amgx>/lib/examples, then move to folder spack/opt/spack/linux-centos7-cascadelake/gcc-9.3.0/<amgx>/lib (your installation folder) and type:
examples/amgx_capi -m examples/matrix.mtx -c configs/core/CG_DILU.json
Below, a list of useful commands:
spack uninstall <package_name> # uninstalls package
spack load <package_name> # you might need to load a software before using it
spack env create <env_name> # creates environment, useful when dealing with a large number of installations with multiple compilers
spack env list # lists all environments
spacktivate <env_name> # activates environment
spack env status # shows current environment
despacktivate # deactivates environment
spack add <package_name> # adds package to current environment, must be done before installation
spack remove <package_name> # removes package from current environment, must be done before uninstallation
spack find -ldf # lists all the installed packages, showing how the dependencies are linked
5.10. Star-CCM+
StarCCM+ is a commercial CFD software. This section describes how to start and configure STAR-CCM+ on the cluster. The user is expected to have basic experience with STAR-CCM+ and with the Linux terminal. This guide focuses mainly on accessing STAR-CCM+ in graphical mode from a compute node.
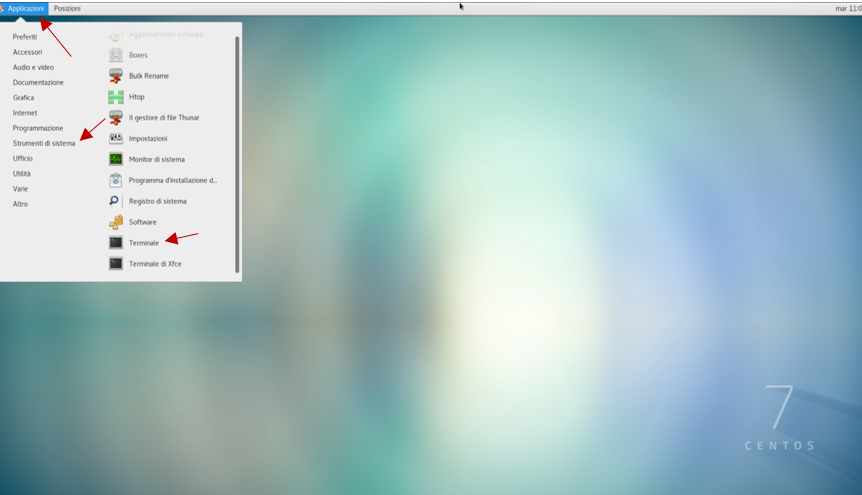
5.10.1. Open the terminal
To access STAR-CCM+ through the cluster, the user first needs to open a terminal window. From the Linux desktop, select:
Applications –> System Tools –> Terminal
5.10.2. Access a compute node
Before launching STAR-CCM+, the user must connect to an available compute node. From the terminal, the following command can be used:
ssh -CYX <node>
where <node> has to be replaced with the compute node that the user wants to use.
The -CYX (capital) option enables remote graphical visualization, which is required to open the STAR-CCM+ graphical user interface from the compute node.
5.10.3. Launch STAR-CCM+ from terminal
After selecting a free compute node, STAR-CCM+ can be launched from the same terminal window using the following command:
/software/starccm_2002008/20.02.008/STAR-CCM+20.02.008/star/bin/starccm+
This command starts the STAR-CCM+ graphical user interface on the selected compute node. If the command is executed correctly, the main STAR-CCM+ window will open after a few moments. From this window, the user can either create a new simulation or open an existing * .sim file.

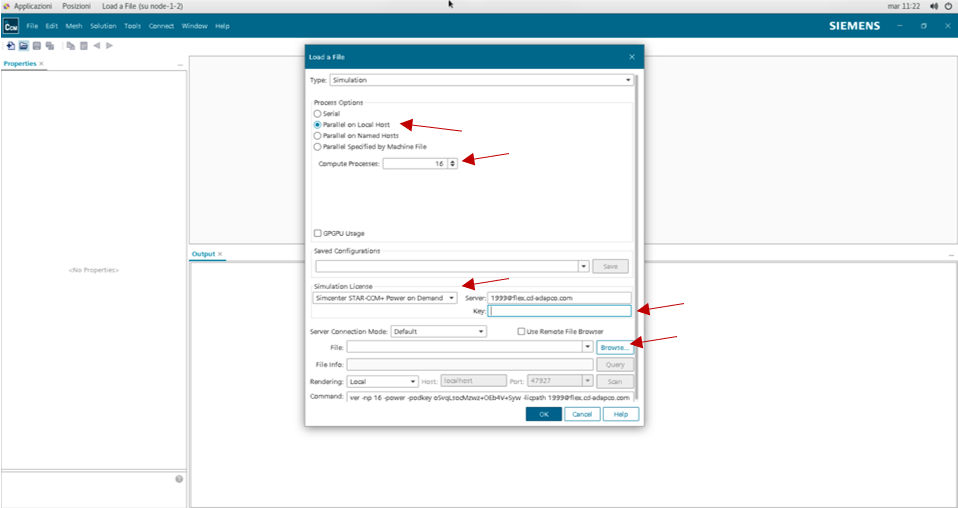
In order to open correctly a file with the licence the Power on Demand option should be activated with the server (1999@flex.cd-adapco.com) and personal licence key.
Distributed license hours are independent of the number of processors used and refer exclusively to the usage time associated with each individual simulation. Consequently, a simulation run in serial mode (using a single processor) and a simulation run on 1000 processors for a duration of 500 hours will consume the same number of license hours.
By contrast, two serial simulations run simultaneously for 500 hours each will result in a total consumption of 1000 license hours. Therefore, from a license usage optimization standpoint, it is more advantageous to run a single case on a large number of processors rather than multiple separate cases on individual processors.
The counting of license hours begins when the case is opened and continues until it is closed. Accordingly, all phases of work are included in the count, including pre-processing activities (CAD and mesh generation), simulation, and post-processing (contours, videos, etc.).
Furthermore, if the software crashes but the case remains open, the license hours will continue to be counted. For this reason, it is recommended to monitor the simulation regularly and to save and close the case whenever it is not expected to be used for several hours.
5.10.4. Parallel run on a single node
In order to open or create a file, with the Parallel on Local Host option, it is possible to choose the number of CPUs to work with (generally from 1 to 16).
If the user wants to run a parallel simulation using only the resources of a single node, the number of requested processes must be compatible with the resources available on that node.
The number of CPUs should be chosen according to the available cores and to the instructions provided by the cluster administrator or CFDHub contact person.
5.10.5. Management of residual or crashed processes
If STAR-CCM+ closes unexpectedly or the simulation stops because of an error, some residual processes may remain active on the compute node.
The user can check this by using:
top or htop
If residual STAR-CCM+ processes are present, they should be closed carefully. Before manually terminating a process, the user should make sure that the process is actually related to the STAR-CCM+ session that has crashed.
When the work is completed, STAR-CCM+ should be closed properly and the user should leave the compute node by typing:
exit