3. ACCESS TO THE CLUSTER
This section describes how to install and set-up the software needed to connect your terminal (workstation or laptop) to the cluster.
The cluster environment is Linux OS. If you need some information on how to work in a Linux environment you may check the Ubuntu Help or a UNIX Tutorial.
The cluster’s infrastructure can be explained as following. The master node is the machine that manages all the communications between the cluster resources and the login nodes. Login nodes (nodevg-0-x) are the nodes used to manage the interaction between users and graphical ports and the computing nodes. When you log into the cluster you actually log into the master and then to the login nodes. In order to access the master node the user should be connected to Politecnico’s network or, if connected from outside, the user must use the PoliMi VPN.
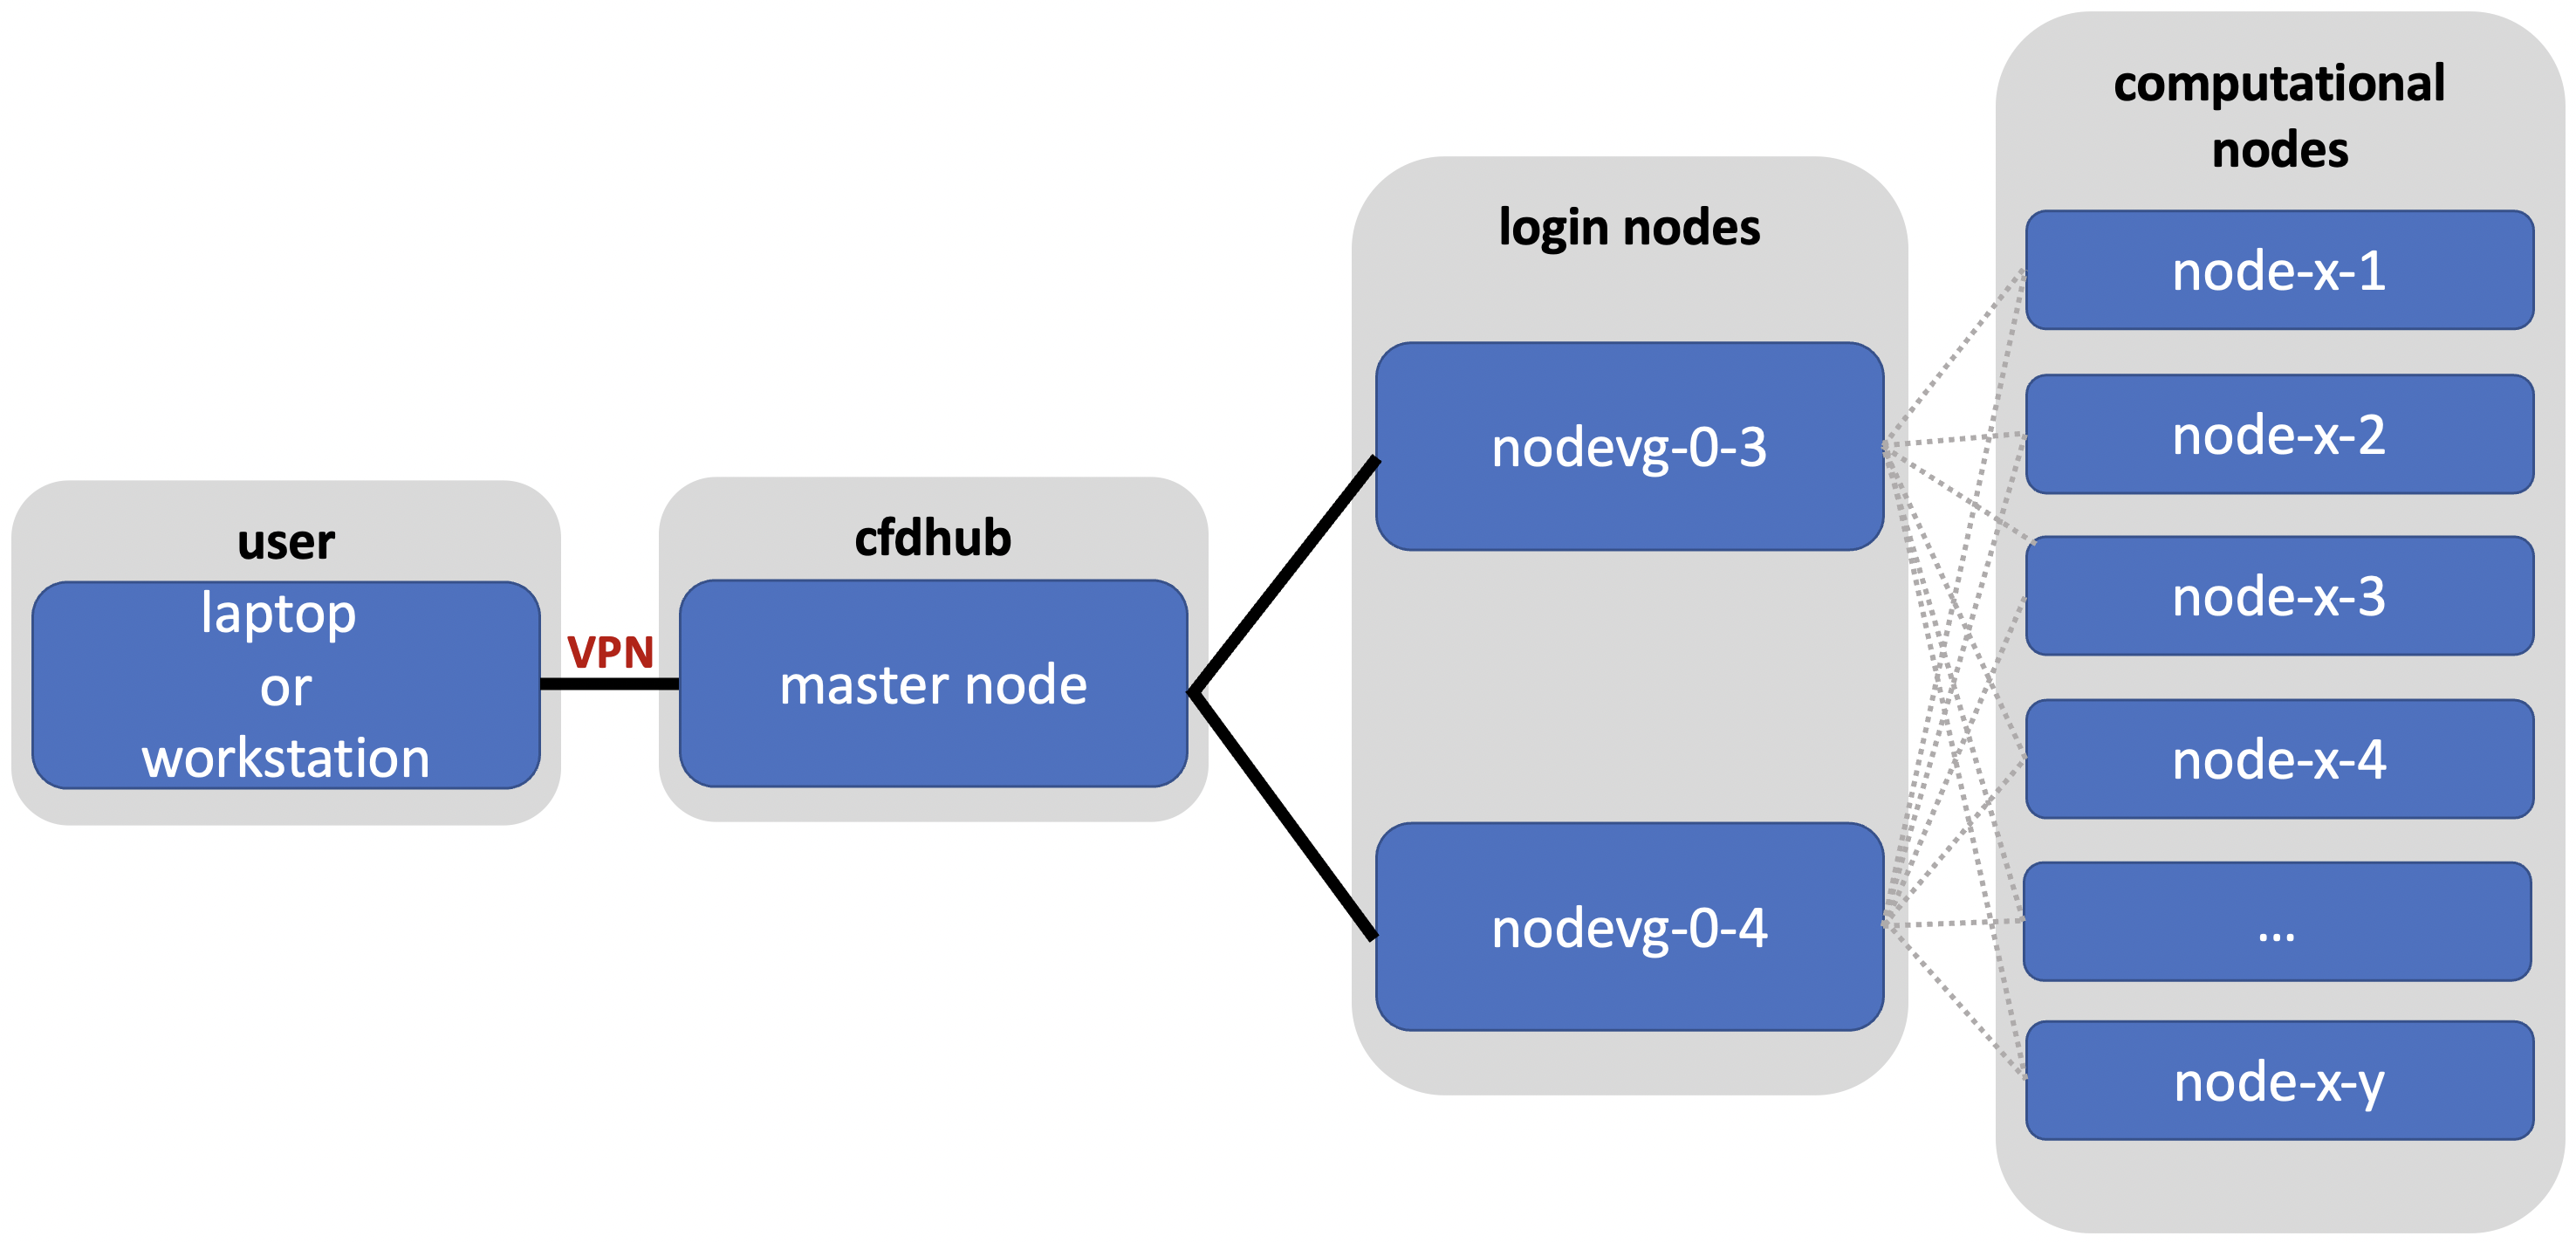
Figure: CFDHub hardware structure for user access.
In order to use the computing resources the user must log in to nodevg-0-1, nodevg-0-2, nodevg-0-3 or nodevg-0-4 depending on your Research Group. The login nodes are distributed as following:
nodevg-0-1: All research groups;
nodevg-0-2: All research groups;
nodevg-0-3: All research groups;
nodevg-0-4: All research groups.
Remember:
Note for long-term users:
All the volumes in /ARCHIVIO are mounted on demand as soon as the user access the folders and unmounted after a certain inactivity time.
3.1. WORKING AREAS
The system is divided in different working areas in order to permit a more sustainable and efficient use of the available resources. The main working areas are reported and descrbed in the following section. Please check the relus for each working area in otder to avoid the functionality of the whole system.
/home
Purpose: to save personal data such libraries, source code, compiled code, documents etc…
In general this area is reserved to files that the user think should be backed up.
Capacity: Each user has an assigned quota of 20Gb.
This limitation exits to avoid the filling up of the /home area.
To know the used space:
du -hs $HOME
Access: from all nodes
Backup: YES
/global-scratch/bulk_pool
Purpose: to launch production runs, data manipulation, elaboration, production etc… In order to preserve the purpose of this area and avoid a filling
up of the area all data older than 50 days will be deleted from this area. Please be careful and move your data to /ARCHIVIO area when they are not on use anymore.
Capacity: Each user has an assigned quota of 100Gb. To know the total quota and the actual available quota:
beegfs-ctl --mount=/global-scratch --getquota --uid $USER --storagepoolid=1
Access: from all login nodes.
Backup: NO
/global-scratch/flash_pool
Purpose: to launch data manipulation, production, elaboration etc… when fast read/wirte speed is crucial for the task.
Capacity: Each user has an assigned quota of 10Gb. To know the total quota and the actual available quota:
beegfs-ctl --mount=/global-scratch --getquota --uid $USER --storagepoolid=2
Access: from all login nodes.
Backup: NO
/ARCHIVIO
Purpose: save the results and data you want to keep for long term. This area permits to store data without affecting the running processes in other working areas.
Capacity: related to the amount of storage purchased by your Research Group, divided into blocks of 8Tb.
Access: from all nodes.
Backup: NO, however considered reliable being residing on enterprise band hard-drives with multi-disk data redundancy.
3.2. CONNECTION REQUIREMENTS
The CFDHub HPC can be accessed in two ways :
directly from PoliMi network (e.g. polimi-protected/eduroam wifi networks or wired network);
from VPN service;
The latter method is used when the user is outside the PoliMi network. Please refer to the VPN guide to set-up the VPN connection.
3.3. VPN SERVICE ACTIVATION
To access the CFDHub HPC machines when the user is outside PoliMi network, you are required to ask your own Department IT staff the activation of VPN service for your PoliMi account. Some indications are reported at the following link: https://www.asict.polimi.it/en/network-services/vpn.html
3.4. STEPS FOR HPC ACCESS
The very first time you access to the cluster you should follow the instructions reported in chapter SSH connection (Linux/MacOS). Then you need to wait 15 minutes for the propagation of the password through the system.
You may access the first time also using Windows, you may follow the first SSH connection instructions.
If you access the cluster from a Windows machine, jump to the chapter SSH connection (Windows users).
If you access the cluster from a Linux OS/MacOS, you can jump to next chapter SSH connection (Linux/MacOS).
3.5. SSH CONNECTION (Windows)
If you are accessing from a Windows machine, the steps to access the HPC machines (through both PoliMi network or VPN service) are:
creation of the graphical port for remote control of the cluster and use of VNC tool;
setting of a VNC session to graphically access and control the HPC machines;
settings to upload and download files to/from HPC machines to the local one.
3.5.1. SOFTWARE REQUIREMENTS
Download and install the software MobaXterm. The next guide is referred to this software.
An alternative and quick solution is Putty. The user should know how to configure this software.
3.5.2. First SSH connection
During the first connection, the system asks the user to change the ‘first access’ password provided by the administrator.
Open a shell in MobaXterm or in Putty and type:
ssh <username>@131.175.56.199
and follow the instruction on the terminal.
During the password typing process, the characters are not shown. It is possible to copy the password, to paste it on the terminal please use the right mouse button.
Once the system accepts the new password it is possibile to proceed to the SSH connection settings.

In case this error appears on the screen, please check:
your internet connection;
if your VPN connection works properly;
verify if the access to the cluster works by typing
ssh <username>@131.175.56.199. In this case please check any information on the terminal: usually a password change is required. In less usual conditions,the user may be locked or disabled: in this case please contact your Contact Person and wait for instructions.
3.5.3. DETAILED SSH CONNECTION SETTINGS
Open MobaXterm software:
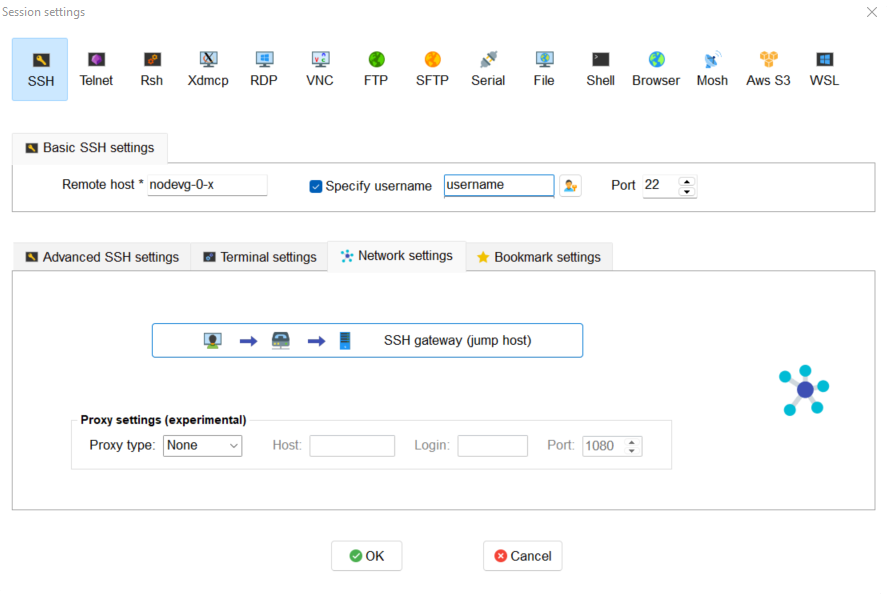
Go to Sessions Tab –> New Session –> choose SSH and open the Network settings panel
Set up Basic SSH settings as described in Figure. Use your
<username>and nodevg-0-x, where x = 3,4 based on your Research Group
Set up the SSH session as described in next Figure for SSH gateway (jump host) voice. Use your
<username>and nodevg-0-x, where x = 3,4 based on your Research Group. Click OK to save
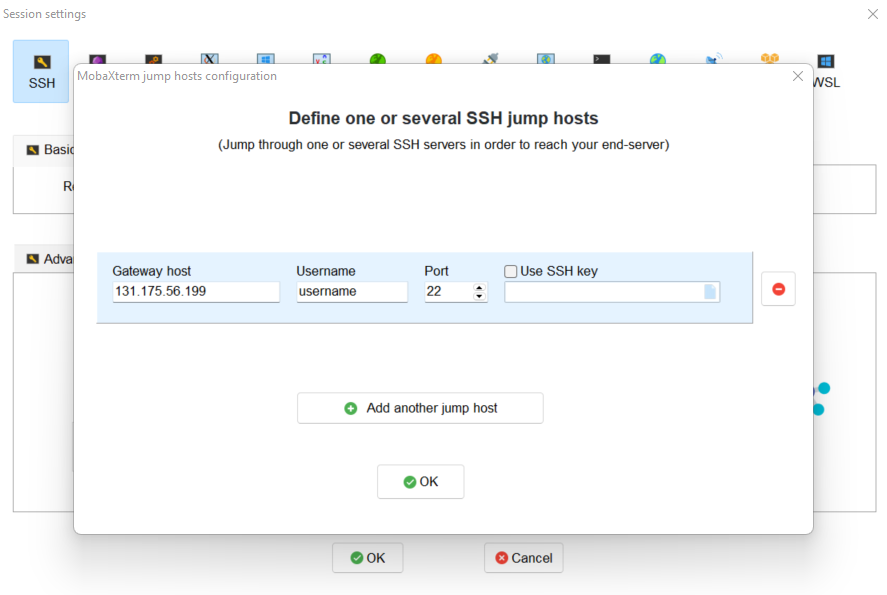
Click OK to save the session.
3.5.4. CREATION OF A GRAPHICAL PORT
Open the previously created SSH session from the left lateral bar:
In the SSH terminal digit:
vncserver -name <username> -geometry 0000x0000 -depth 24
where:
0000x0000 is the resolution of the monitor you use to work, for example if the user wants to work with a 1920 x 1080 resolution, the command should be changed as follows:
vncserver -name <username> -geometry 1920x1080 -depth 24
After launching the previous command, the following message is presented:
New '<username>' desktop is nodevg-0-x:NNStarting applications specified in /home/<research_group>/<username>/.vnc/xstartupLog file is /home/<research_group>/<username>/.vnc/nodevg-0-x:NN.log
The graphical port assigned to the user is indicated by the system, in this example the assigned port is NN.
3.5.5. SETTING OF VNC SESSION
Go to Sessions Tab –> New Session –> choose VNC and open the Network settings panel
Set up Basic VNC settings as described in Figure. Use your nodevg-0-x, where x = 3,4 based on your Research Group and the port number provided by the system in the previous step putting it after the number 59 (e.g. if the assigned port is NN, put 59NN instead of 5900);

Set up the VNC session as described in next Figure for SSH gateway (jump host) voice. Use your
<username>and nodevg-0-x, where x = 3,4 based on your Research Group. Click OK to save.
Click OK to save the session
3.6. SSH CONNECTION (Linux/MacOS)
First connect to SSH server 131.175.56.199 through Port 22. Then to start working on the cluster, it is necessary to connect to the login nodes nodevg-0-3 or nodevg-0-4, depending on your Research Group.
IMPORTANT: During the very first access, the system will ask you to change your password. At the password change prompt request, insert the temporary password provided by the administrator and than the new password (which must be fillet two times for verification purpose)
Be carefull because the password characters inserted are not shown at all, so be sure that the string you filled or copied is correct. If you are not sure, close the terminal and open it again. Remenber that three wrong password change attempts will lock your user.
If the password change is not needed anymore, you will get the bash prompt.
3.6.1. Access from terminal
This method enables the user to access the cluster just from terminal, without graphical interface. For Linux/MacOS users the command, from terminal, to access the master node is:
ssh <username>@131.175.56.199
then to access your login node you may choose
ssh nodevg-0-x
where x = 3,4 depending on your Research Group.
For data transferring between cluster and your local machine, refer to chapter Data transferring for Linux/MacOS.
3.6.2. Access with VNC remote desktop (MacOS)
This method enables the user to access the cluster with a VNC-based remote desktop window.
Open a terminal and type:
ssh -L 59yy:nodevg-0-x:59yy -J <username>@131.175.56.199 <username>@nodevg-0-x
where yy is the the user-specific graphic port, x = 3,4 depending on your Research Group. Enter your login password when asked.
Open Safari browser, type in the adress bar: vnc://localhost:59yy where yy is the the user-specific graphic port. Enter your login password when asked.
3.6.3. Access with VNC remote desktop (Linux)
For this method the Remmina utility is required. In user friendly Linux distribution as Ubuntu, Remmina could come pre-installed. However for Ubuntu it is possibile to follow this guide to install it. For other distributions follow this link.
Open Remmina from the GUI or from the terminal by typing:
remminaCreate a new session by selecting the icon as shown in next figure:
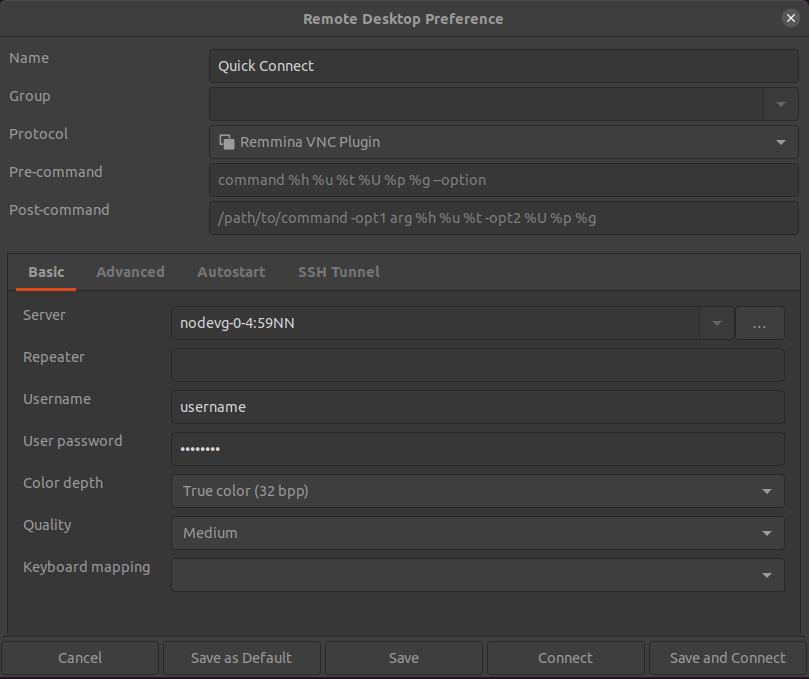
Select form the Protocol drop down menu the voice Remmina VNC Plugin. Select Basic tab. In Server voice put your login node, where x = 3,4 depending on your Research Group, followed by “:59NN”, where NN is the the user-specific graphic port, as can be seen in next figure. Complete with your
<username>and<password>. For the Color depth and Quality follow the instructions in next figure.
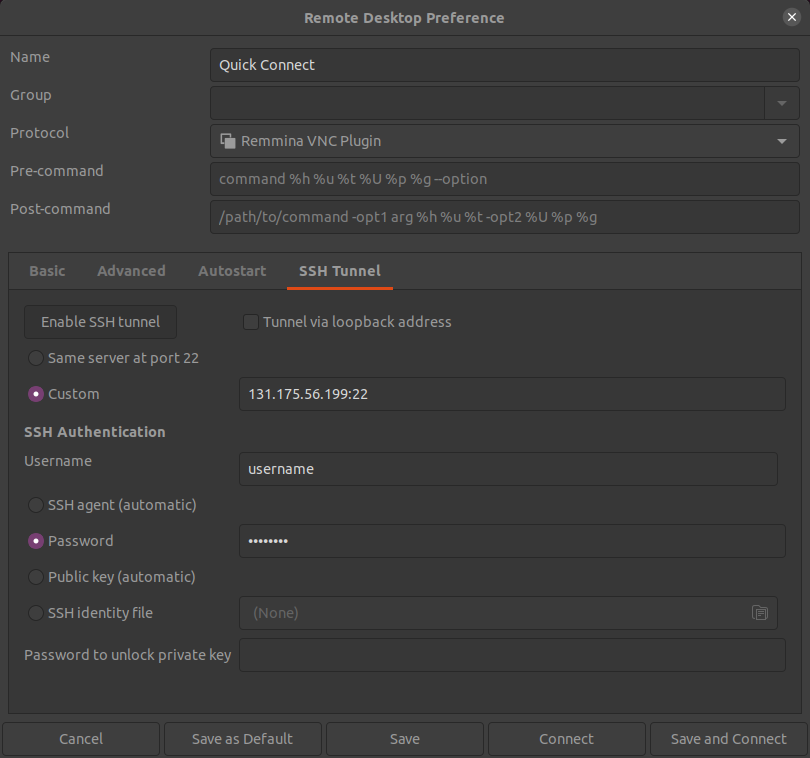
Select SSH Tunnel tab. Enable SSH Tunnel by click on it. Select Custom voice and complete with 131.175.56.199:22. Put your
<username>and<password>on their respective voices. In next figure the user could find an example:
Click on Save. The configuration is ended and saved, you should be able to enter to your graphical port just by clicking on the new created session.
3.7. DATA TRANSFERRING (Windows)
To transfer data between the user local folders and cluster folders is necessary first to setup a tunnel and then to connect to the cluster through it.
3.7.1. TUNNELLING SETUP
Open MobaXterm:
Go to Tunneling Tab –> New SSH tunnel –> Local port forwarding
Set-up Local port forwarding as indicated in the figure below. Use your
<username>and nodevg-0-x, where x = 3,4 based on your Research Group. Click “Save” to close the setup window.
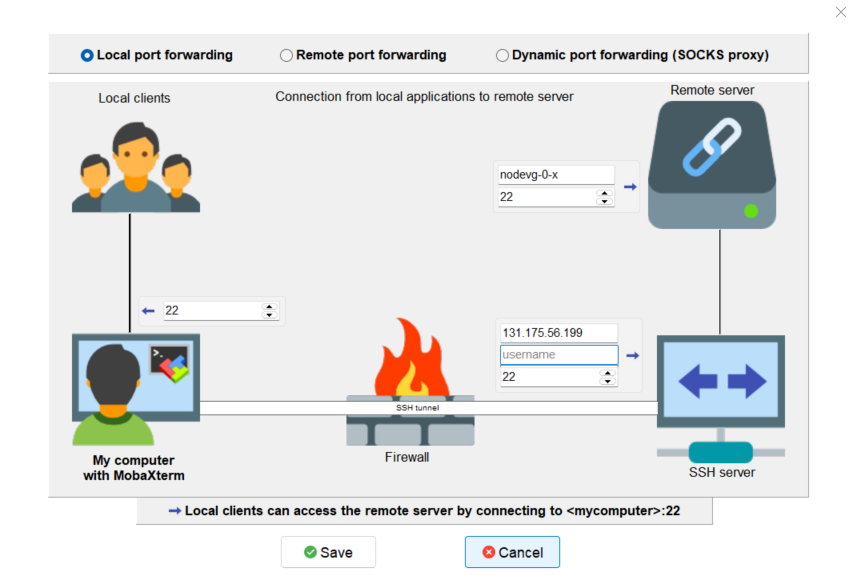
The tunnel setup is completed, click “Exit” to end the procedure.
Now the user has two alternatives to transfer data between local and cluster folders.
3.7.2. DATA TRANSFER SETUP (MobaXterm)
Open tab Tunnelling and run the symbol play of the previously created tunnel as can be seen in next Figure.
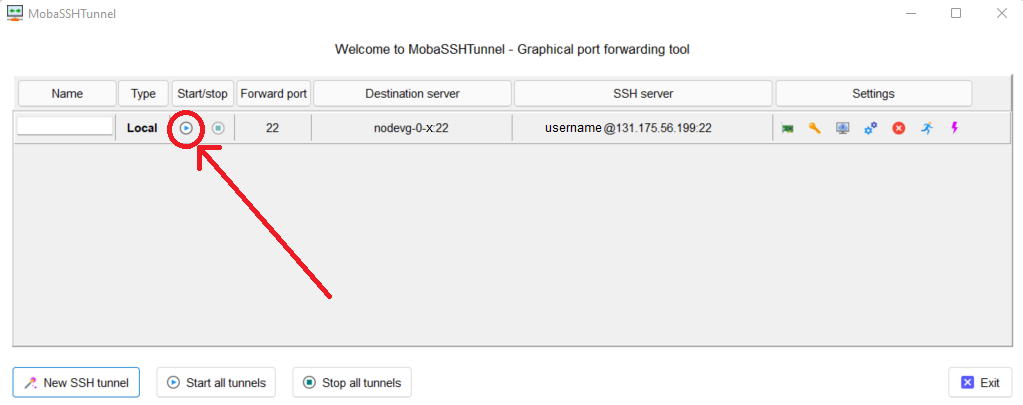
Close MobaSSHTunnel window.
Go to Sessions Tab –> New Session –> choose SFTP
Set up Basic Sftp settings: insert host 127.0.0.1, your
<username>and port 22.Click OK to save the session. If asked insert your
<password>.Once you inserted your user data and accessed to the cluster, you will see in the left side your local folders and in the right side the cluster folders. To transfer (copy) data just drag files from one side to the other.
3.7.3. DATA TRANSFER SETUP (MobaXterm + FileZilla)
If the user prefers to use FileZilla, it is possible to establish the tunnel connection with MobaXterm and then to use FileZilla just for data transferring.
Open MobaXterm:
Open tab Tunnelling and run the symbol play of the previously created tunnel as can be seen in next Figure.
Close MobaSSHTunnel window. Do not close MobaXterm.
Open FileZilla:
Insert host 127.0.0.1, your
<username>, your<password>and port 22.Click “Quickconnect”. Once you inserted your user data and accessed to the cluster, you will see in the left side your local folders and in the right side the cluster folders. To transfer (copy) data just drag files from one side to the other.
3.8. DATA TRANSFERRING (Linux/Mac OS)
3.8.1. Direct data transferring form terminal
In order to transfer files from your terminal to the cluster and vice versa, you may use the scp command from Linus OS.
scp <sourceDir> <targetDir>scp <localFile> <username>@131.175.56.199:<remoteDirectory>scp <username>@131.175.56.199:<remoteFile> <localDirectory>scp -r <localDirectory> <username>@131.175.56.199:<remoteDirectory>scp -r <username>@131.175.56.199:<remoteDirectory> <localDirectory>
Since the global scratch directory is not visible on the master node, it is possible to copy the files directly to the scratch area using the following instructions, using any nodevg-0-x node:
scp -r -o ProxyCommand="ssh <username>@131.175.56.199 -W nodevg-0-1:22" <username>@nodevg-0-1:<remoteDirectory> <localDirectory>scp -r -o ProxyCommand="ssh <username>@131.175.56.199 -W nodevg-0-1:22" <localDirectory> <username>@nodevg-0-1:<remoteDirectory>
You may also use rsync for a smarter data transfer, using the following command:
rsync -chavP -e 'ssh -o ProxyCommand="ssh -A <username>@131.175.56.199 -W %h:%p"' <username>@nodevg-0-1:<remoteDirectory> <localDirectory>rsync -chavP -e 'ssh -o ProxyCommand="ssh -A <username>@131.175.56.199 -W %h:%p"' <localDirectory> <username>@nodevg-0-1:<remoteDirectory>
3.8.2. Filezilla
In order to use Filezilla for file transferring, the user needs to type the following command in the terminal:
ssh -L 2200:nodevg-0-x:22 -J <username>@131.175.56.199 <username>@nodevg-0-x
where x = 3,4 depending on your Research Group. This enable the local port 2200 for sftp protocol.
Then, in Filezilla, connect to the cluster with the following settings:
Host: sftp://localhost
Username: <username>
Password: user password
Port: 2200
Click connect and you can now access the local directories on the left branch and the remote ones on the right one.
3.9. USER MANAGEMENT
In this section some basic Linux OS concepts will be explained with the aim of teaching to the user how to manage the working area for personal work.
After logging in to a login node, the user is directed to his personal home directory, which is a subdirectory of the /home partition.
The user can check which path he is located in by typing in the terminal:
pwd
Something like this will be displayed:
/home/<research group>/<username>
If the user wants to work in the /global-scratch/bulk_pool partition for example, it is first necessary to create a personal directory.
In order to move to another path, the user should use the “cd” command followed by the path the user wants to reach:
cd /global-scratch/bulk_pool
Now the user can create a personal directory where the user could work, following the limitation previously exposed.
In order to create a directory, the user should use the “mkdir” command followe by the name of the directory:
mkdir <username>
Now the user can go to the fresh new directory using the “cd” command. The creation of the personal directory on a partition is a one-time operation.
Each user should work in his own personal directory.
If the user needs to come back to personal home, the “cd” command must be followed by nothing:
cd
If the user needs to work in other partitions (/global-scratch/flash_pool, /ARCHIVIO, others…), it is possibile to repeat this procedure to create a new personal directory.
The user can create shortcuts in the .bashrc file in order to have a faster experience. This file is located in the personal home but is a hidden file. In order to see what is contained in a path the command ls is used:
ls
However, this command doesn’t show hidden files as .bashrc. The ls command should be used by adding a flag.
In the personal home, launch:
ls -a
All files are displayed and is possible to see the .bashrc.
The .bashrc is a list of commands, variables and aliases that are launched when the user logs in to a node and opens a terminal window.
To check the space used in the /global-scratch/ partition, it is possible to use the following command:
beegfs-ctl --getquota --uid $USER
It is possible to create a variable to avoid the typing of a long path. For example, if the user wants to move to its personal directory in /global-scratch/bulk_pool partition, it is possible to create a variable to directly access it without typing the entire path in the terminal. To edit with a graphical text editor the bashrc the user can use gedit (an advanced user could use vim or another terminal editor):
gedit .bashrc
At the end of the .bashrc file it is possible to write the name of the variable and the substituted path:
EXAMPLE=”/global-scratch/bulk_pool/<username>”
The the user should update the terminal:
source .bashrc
Now, in order to move to the personal directory in the /global-scratch/bulk_pool partition, instead of:
cd /global-scratch/bulk_pool/<username>
It is possible to use:
cd $EXAMPLE
It is also possible to create an alias which could be used to launch a command with a long syntax. For example, it is possible to create an alias
to move to my personal directory in the /global-scratch/bulk_pool partition.
As previously showed, at the end of the .bashrc file I can write:
alias EXAMPLE=’cd /global-scratch/bulk_pool/<username>’
Now, after sourcing the bashrc, instead of:
cd /global-scratch/bulk_pool/<username>
It is possible to use:
EXAMPLE
This command could be useful for example if the executable file of a program is located in a directory whose path is very long and the user wants to avoid typing the complete path each time this file is needed.
For people of User Group “meccanica” it is possible to source some useful aliases, by sourcing bash_dmec in the /software/environment/dmec folder. You may add
source /software/environment/dmec/bash_dmec
to your .bashrc in the $HOME folder.
3.10. TROUBLESHOOTING
In this section some best practices will be presented, in order to avoid common problems.
In the .bashrc it is possible to launch commands in order to start some softwares or source an environment or library, for example, directly when the use logs in to the cluster.
However, this procedure is not recommended because could cause compatibility issues with some pre-loaded libraries.
Keep your .bashrc file as clean as possible.
If you need to launch a software, source an environment or library just do it from the terminal or create a separate file (.aliases as an example) to be sourced after login.
It is possible that a process launched by the user crashes but continues to run in background. When this happens, the user could kill the process from the terminal.
First the user should identify the process by typing in the terminal:
htop -u <username>
All the process lanched by the user in the node are displayed. Then the user should identify the process to kill by the PID number displayed on the left column.
To close the htop use the shortcut ctrl+C.
In order to kill that process:
kill -9 <PID number>
It is possible for various reasons, that the user cannot log in a login node after the jump from master node.
In this case the user is logged in the master node and not in a login node (for example nodevg-0-4).
If this happens it is shown in the terminal:
[<username>@master ~]$
Instead of:
[<username>@nodevg-0-4 <username>]$
If this happens, DO NOT LAUNCH ANY PROCESS. The computational power of the master node is sufficient to manage all the cluster’s users logins but not to launch any type of simulation, data manipulation or other tasks.
The user should use just one graphical window at time, if more than one window is used the system admin could choose to close all the graphical ports.
This could lead to losing all the work in progress in graphical windows.
Next it will be explained how to check if and how many graphical ports are running.
In the terminal type:
ps -eo pid,ruser=RealUser -o cmd | grep <username> | grep /bin/Xvnc | grep -v "grep"
The list of all running graphical windows will be displayed, in this example the user has two running graphical port:
PID1 <username> /usr/bin/Xvnc :NN -auth /home/<research_group>/<username>/.Xauthority etc…PID2 <username> /usr/bin/Xvnc :NM -auth /home/<research_group>/<username>/.Xauthority etc…
For each graphical port, the corresponding PID is displayed in the first column.
After “/usr/bin/Xvnc” the number of the graphical port is listed.
In this example the user has two graphical port: NN and NM.
If the user is working in the NN graphical window and has opened by accident the NM port, the corresponding process should be killed:
kill -9 PID2
Giving a new check, just the desired graphical window should be displayed:
PID1 <username> /usr/bin/Xvnc :NN -auth /home/<research_group>/<username>/.Xauthority etc…
It could happen that the graphical windows are closed for several reasons as cluster shutdown, maintenance or other problems. If the user is using MobaXTerm, an error like the following one could be displayed:
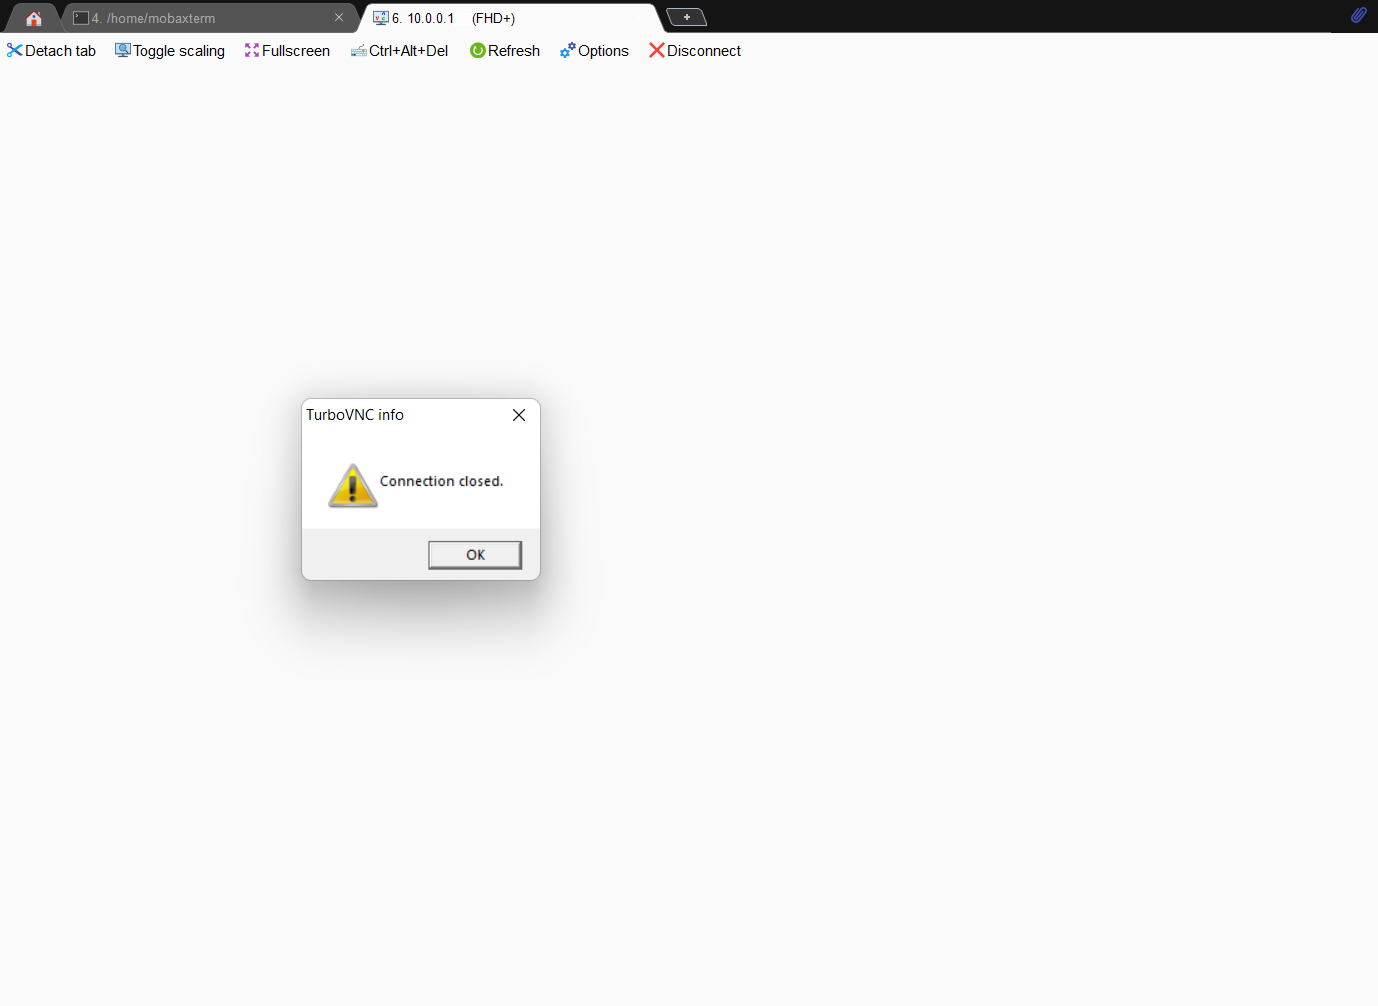
In this case the user should check, following the previous indications, if the graphical port is running. If no PID and port number is displayed, the user should repeat the creation of the graphical port.