6. CFDHub side projects
There are some projects that are related to CFDHub, but dedicated to didactic purposes.
6.1. CALIMERO
Calimero is a cluster that is used for teaching activity. it is composed by 3 nodes Intel(R) Xeon(R) CPU E5-2680 0 @ 2.70GHz with sandybridge architecture and Rocky Linux 8.
6.1.1. CONNECTION REQUIREMENTS
Calimero can be accessed through VPN service and VPN should be used when the user is inside or outside the PoliMi network. Please refer to the VPN guide to set-up the VPN connection.
6.1.1.1. VPN Installation
Follow the three points for the installation:
Personal Polimi Certificate installation
Download and installation of the GlobalProtect VPN client
Connection to Polimi network
Procedure: 1. Connect to the VPN portal 2. The “Portal Address” is: gp-deng-saml.vpn.polimi.it (Energy Department)
6.1.2. HOW TO ACCESS CALIMERO
After following the instructions on how to install the vpn of the department of energy, do the following steps: Open Mobaxterm and open the session tab.

Go in the SSH session setting.
In Basic SSH settings insert as remote host 131.175.11.133
Flag the specify username option and insert the first letter of your name and your surname (es for
Mario Rossi: mrossi).
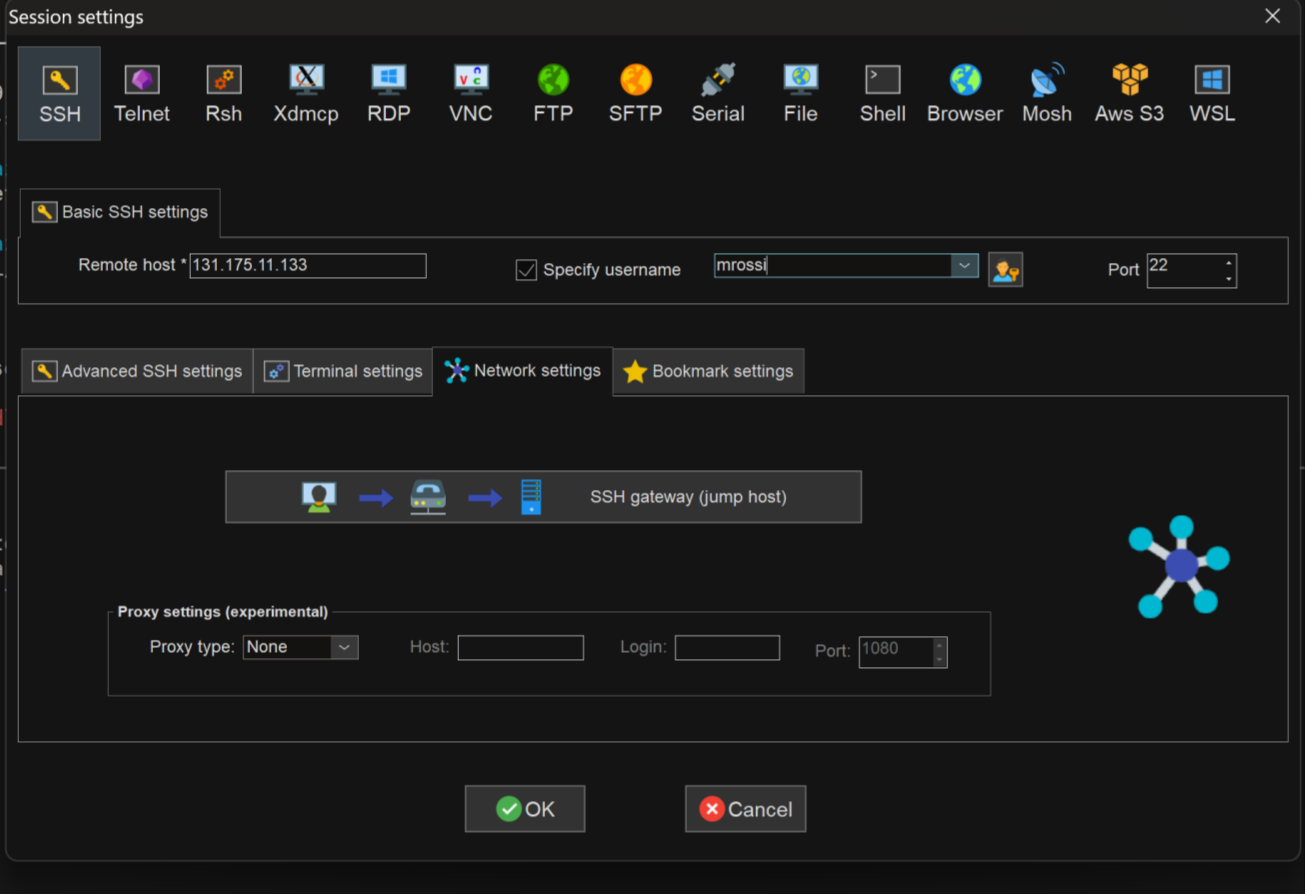
Click ok: your new session is available on the left column.
Open the session just created: you are now in the Master environment. The very first time you access to Calimero you wil be asked to change your first access password (typically it will be the concatenation of matricola and PersonCode without spaces). When you enter the new password the characters will not be shown.
Important: do not launch anything from here. Everything launched from here is stopped by default.
After changing password you need to configure your environment by copying the configuration files (do not worry if the directories are not copied):
cp /etc/skel/.* ~/.
Then you may disconnect and reconnect to the cluster (the password may take some time to be updated on the entire system).
Enter cd /global-scratch
The / before global-scratch means that you are starting from the system root, hence this line of code will bring you always to the global-scratch directory wherever you are when you type it.
To create your personal folder is inside the global-scratch folder: mkdir $USERNAME
All simulations must be launched from the personal folder.
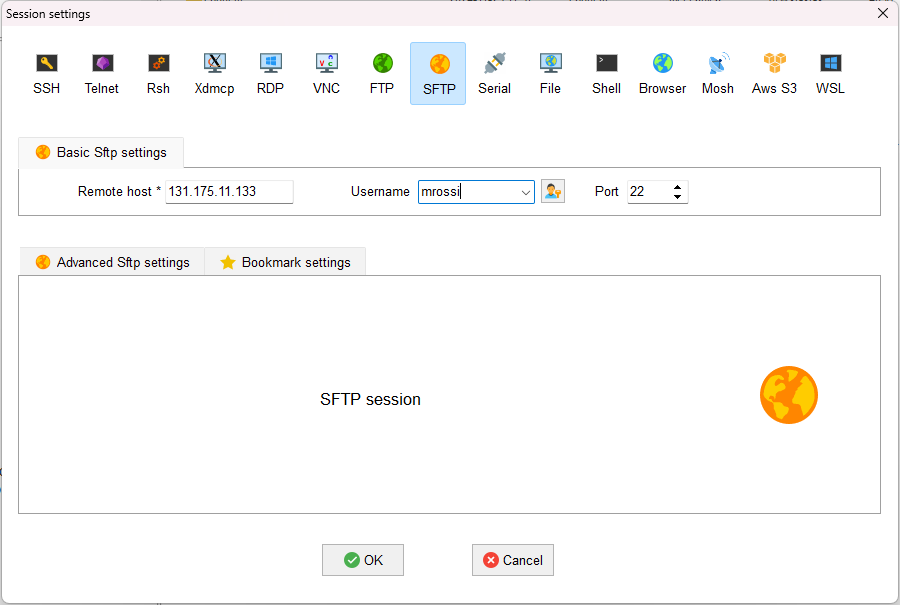
6.1.3. HOW TO TRANSFER FILES TO-FROM CALIMERO
To access and transfer files to and from calimero, create a new SFTP session on MobaXTerm. Insert remote host: 131.175.11.133 Insert your username
Connect to the SFTP session, you will have a column on the left with your local files and a column on the right with the server files. You can move items from one to the other by simply dragging them from one side to the other.
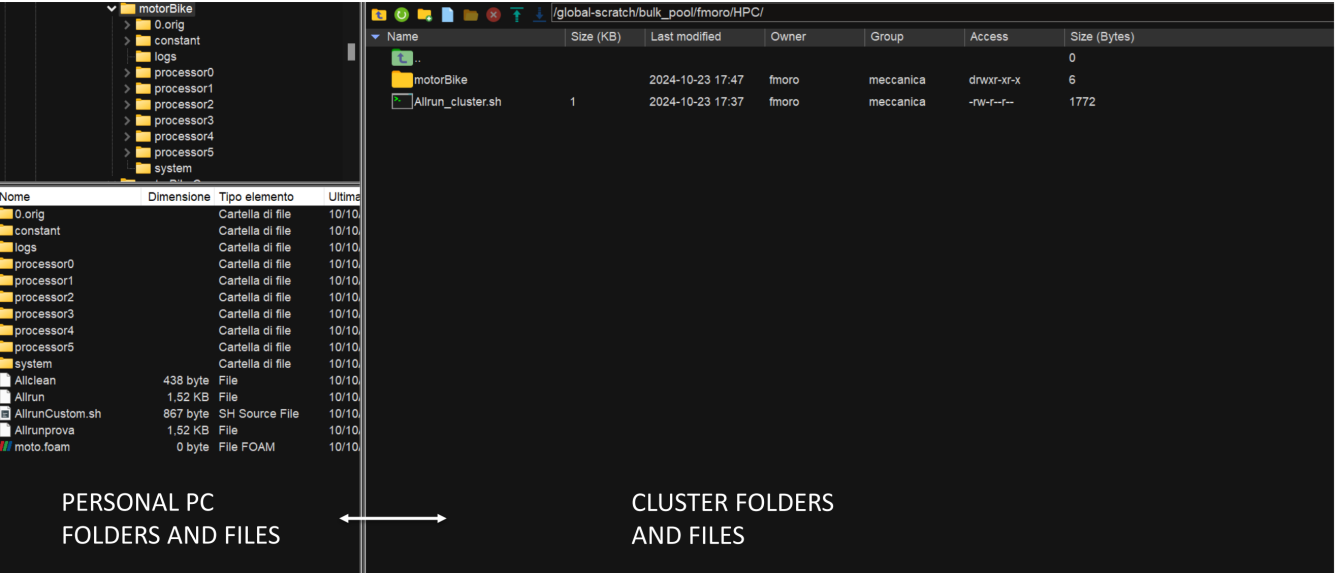
You can access different folders of the system by copying the absolute path.
Linux users may copy files or folders from command line using:
scp localFile username@131.175.11.133:/remotefolder
scp username@131.175.11.133:/remotefolder/remoteFile  localFolder
scp -r localFolder username@131.175.11.133:/remotefolder
scp -r username@131.175.11.133:/remotefolder localFolder
6.1.4. HOW TO LAUNCH JOBS
To submit a OpenFOAM job using queues, prepare the launch file OpenFOAMJob.sh that will be used to run your script. Please check with your Professor what are the queues you have access to.
The result of the computation will be written on file according to what you specified in your system/controlDict file. The output will be written on the jobOutput file. if you wish you may redirect in another file (typically log.$solver).
If you are asking for more than one cpu, please make sure your requested cpus and the number of *processors are coincident, so you will use all requested cpus.*
Here an example of launch file:
#!/bin.bash             # use bash as command interpreter
#$ -cwd                 # currentWorkingDirectory
#$ -N myOpenFOAMJob     # jobName
#$ -j y                 # merges output and errors
#$ -S /bin/bash         # scripting language
#$ -l h_rt=3:00:00      # jobDuration hh:mm:ss
#$ -q all.q             # queueName
#$ -pe mpi 4            # cpuNumber
#---------------------------------------------------------

### LOAD THE OPENFOAM ENVIRONMENT
module use /software/spack/spack/share/spack/modules/linux-rocky8-sandybridge/
module load openfoam/2306-gcc-13.2.0-tnytlfv

#---------------------------------------------------------

### EXECUTE COMMANDS
#./Allrun

blockMesh >& log.blockMesh
decomposePar >& log.decomposePar
mpirun --hostfile machinefile.$JOB_ID snappyHexMesh -parallel >& log.snappyHexMesh
mpirun --hostfile machinefile.$JOB_ID simpleFoam -parallel >& log.simpleFoam
reconstructPar -latestTime >& log.reconstructPar
sample -latestTime >& log.sample

echo End Parallel Run
Just add/remove hashtags [#] to comment/uncomment the lines. To execute the commands, you may either include an executable file (Allrun in this case), or list all relevant commands.
To launch your OpenFOAMJob.sh file from the master node, from the jobDirectory you may execute:
[<username>@nodevg-0-x jobDirectory]$ qsub OpenFOAMJob.sh
To check the status of the job you may use the qstat -u <username> command to see if the job started. To check how the job is proceeding from the login node, reading the output, you may use:
[<username>@nodevg-0-1 jobDirectory]$ tail -f log.simpleFoam
Useful commands are:
Command |
Description |
Example |
|---|---|---|
|
Submit a job |
|
|
Show status of jobs |
|
Show status of queue |
|
|
|
Delete a job |
|
|
Move a job to a different queue |
|
To check the status of the cluster you may add to your .bashrc file the following aliases and by digiting check or check2 you may control the job status:
alias check='echo "===========RUNNING JOBS============="; echo "    ALL.Q"; qstat -q all.q -s r -u "*"; echo "    DIDA.Q"; qstat -q dida.q -s r -u "*";  echo "============PENDING JOBS=============="; echo "    ALL.Q"; qstat -q all.q -s p -u "*"; echo "    DIDA.Q"; qstat -q dida.q -s p -u "*"; echo "=============SUSPENDED JOBS============="; qstat -q all.q -s s -u "*"; qstat -q dida.q -s s -u "*"; qstat -g c | grep "QUEUE\|.q"'
alias check2='qstat -f -u "*"'
You may find all the software installed on the cluster by using the module command. All software is installed with spack. To see all the software installed you may first load the correct module, and then list all the software; finally you may load your preferred software:
[<username>@nodevg-0-1 jobDirectory]$ module use /software/spack/spack/share/spack/modules/linux-rocky8-sandybridge/
[<username>@nodevg-0-1 jobDirectory]$ module avail
[<username>@nodevg-0-1 jobDirectory]$ module load <software>